限流过滤器
- 在6中我们看到了很多过滤器,但没有这篇讲的这个。
- RequestRateLimiter 限流,RequestRateLimiterGatewayFilterFactory生成。
1. 关于限流
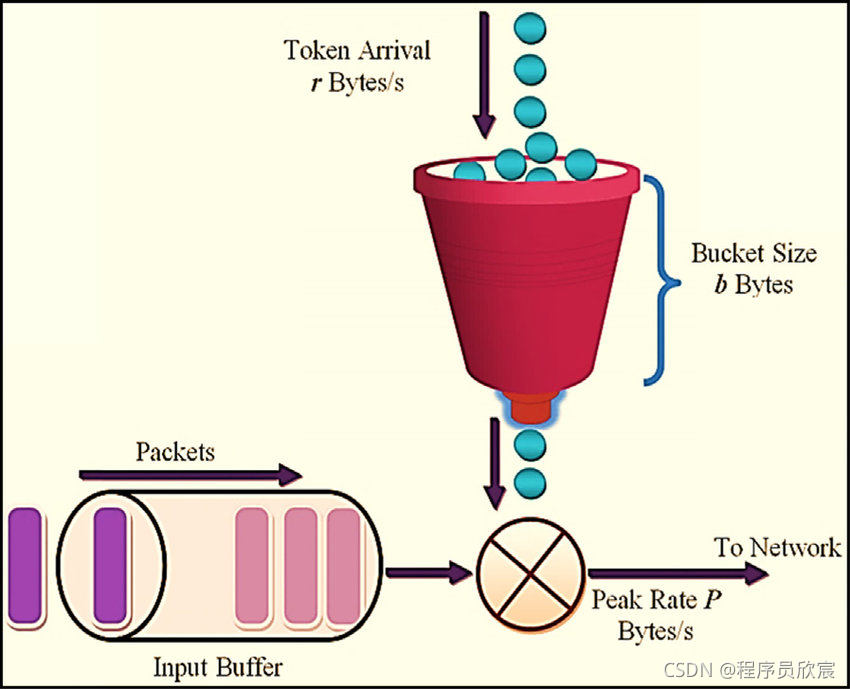
默认的限流器是基于redis实现的,限流算法令牌桶(Token Bucket Algorithm),关于令牌捅的原理就不在此展开了,
装令牌的桶容量有限,例如最多20个,令牌进入桶的速度恒定(注意,这里是和漏桶算法的区别),例如每秒10个,底部每个请求能拿到令牌才会被处理:

2. 使用RequestRateLimiter过滤器的步骤
- 准备可用的redis
- maven或者gradle中添加依赖org.springframework.boot:spring-boot-starter-data-redis-reactive
- 确定按照什么维度限流,例如按照请求中的username参数限流,这是通过编写KeyResolver接口的实现来完成的
- 配置application.yml文件,添加过滤器
3. 实现
- 添加一个接口
@RestController public class UserInfoController { private String dateStr(){ return new SimpleDateFormat("yyyy-MM-dd hh:mm:ss").format(new Date()); } @GetMapping("/userinfo") public String userInfo(@RequestParam("username") String username) { return Constants.HELLO_PREFIX + " " + username + ", " + dateStr(); } } - xml新增
<dependency> <groupId>org.springframework.boot</groupId> <artifactId>spring-boot-starter-data-redis-reactive</artifactId> </dependency> - application.yml
server: #服务端口 port: 8081 spring: application: name: circuitbreaker-gateway # redis配置 redis: host: 127.0.0.1 port: 6379 cloud: gateway: routes: - id: path_route uri: http://127.0.0.1:8082 predicates: - Path=/hello/** filters: - name: RequestRateLimiter args: # 令牌入桶的速度为每秒100个,相当于QPS redis-rate-limiter.replenishRate: 100 # 桶内能装200个令牌,相当于峰值,要注意的是:第一秒从桶内能去200个,但是第二秒只能取到100个了,因为入桶速度是每秒100个 redis-rate-limiter.burstCapacity: 200 # 每个请求需要的令牌数 redis-rate-limiter.requestedTokens: 1 - 指定限流维度的代码CustomizeConfig.java,
- 这里是根据请求参数username的值来限流的,假设真实请求中一半请求的username的等于Tom,另一半的username的等于Jerry,按照application.yml的配置,Tom的请求QPS为100,Jerry的QPS也是100
package com.bolingcavalry.gateway.config;

import org.springframework.cloud.gateway.filter.ratelimit.KeyResolver;
import org.springframework.context.annotation.Bean;
import org.springframework.context.annotation.Configuration;
import reactor.core.publisher.Mono;
import java.util.Objects;

@Configuration
public class CustomizeConfig {
    @Bean
    KeyResolver userKeyResolver() {
        return exchange -> Mono.just(exchange.getRequest().getQueryParams().getFirst("username"));
    }
}
4. 验证
- 确保redis已经启动,并且与application.yml中的配置保持一直
- 启动nacos(provider-hello依赖)
- 启动服务提供者provider-hello
- 启动gateway
- 为了模拟web请求,这里使用了Apache Benchmark
安装的话 linux下发行版里一般有

执行如下命令
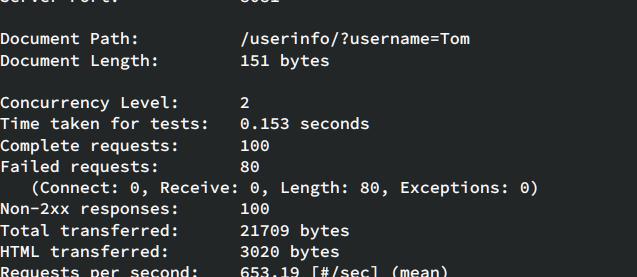
ab -n 10000 -c 2 http://localhost:8081/userinfo/userinfo?username=Tom

可以看到,100个请求只成功了20个。

