spring-oauth2-02 spring的实现
1. spring security oauth2是什么
他是基于spring security 的oauth2实现
前面我们已经讨论了oauth2是一种规范,那么spring security oauth2便是对这种规范的实现,
spring security oauth2对授权服务器和资源服务器做了实现,
如同我们前面所说,授权服务器是获取token,资源服务器是使用和验证token。

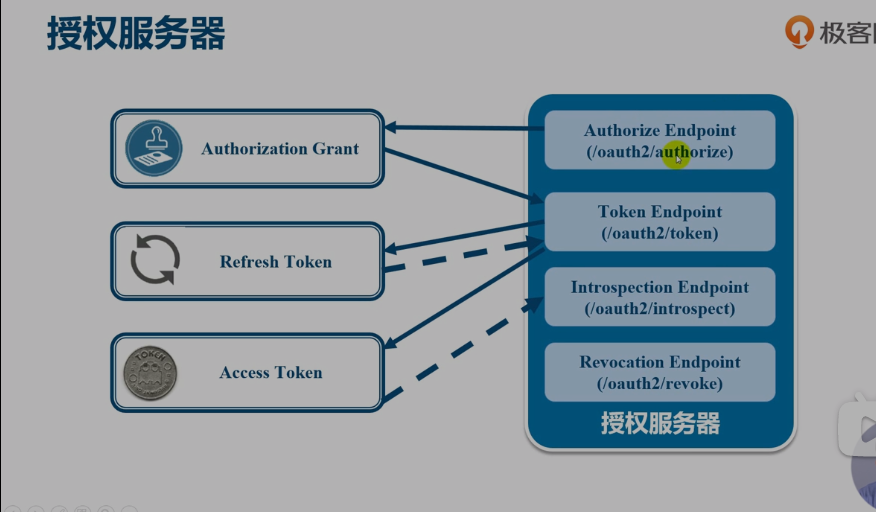
- spring security oauth2的授权服务器提供的功能如上图所示。
这几个端点通过url对外暴露
- 授权端点,可以授权。
- 获取token
- 验证token
- 撤销token
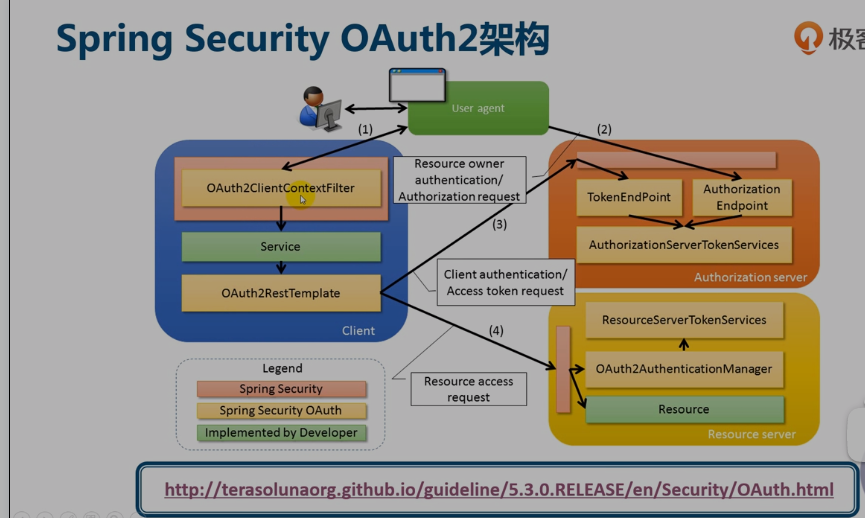
- spring security oauth2的架构如下

可以看出 spring security oauth2
1.提供了一个较为完善的的授权服务器的框架,但我们还是要在他上面做一些封装和开发,以适应项目的要求。
2.提供了一个资源访问的客户端,用来帮助第三方(第一方)客户端获取授权和访问资源。
2. 基于spring security oauth2的 授权模式的实现
本小节主要是使用spring security oauth2来实现几种授权方式(获取token的方式)
参考波波微课oauth2实现
2.1 授权码实现
- 需要的依赖
<dependency> <groupId>org.springframework.boot</groupId> <artifactId>spring-boot-starter-security</artifactId> </dependency> <dependency> <groupId>org.springframework.boot</groupId> <artifactId>spring-boot-starter-web</artifactId> </dependency> <!-- for OAuth 2.0 --> <dependency> <groupId>org.springframework.security.oauth</groupId> <artifactId>spring-security-oauth2</artifactId> </dependency> <dependency> <groupId>org.springframework.boot</groupId> <artifactId>spring-boot-starter-test</artifactId> <scope>test</scope> </dependency> - 配置授权服务器。
//授权服务器配置 @Configuration @EnableAuthorizationServer public class OAuth2AuthorizationServer extends AuthorizationServerConfigurerAdapter { @Override public void configure(ClientDetailsServiceConfigurer clients) throws Exception { clients.inMemory() .withClient("clientapp") .secret("112233") .redirectUris("http://localhost:9001/callback") // 授权码模式 .authorizedGrantTypes("authorization_code") .scopes("read_userinfo", "read_contacts"); } } - 资源服务器配置
//资源服务配置
@Configuration
@EnableResourceServer
public class OAuth2ResourceServer extends ResourceServerConfigurerAdapter {

    @Override
    public void configure(HttpSecurity http) throws Exception {
        http.authorizeRequests()
            .anyRequest()
            .authenticated()
        .and()
            .requestMatchers()
            .antMatchers("/api/**");
    }

}
资源服务器和授权服务器可以是同一台
- 资源接口
@Controller public class UserController { // 资源API @RequestMapping("/api/userinfo") public ResponseEntity<UserInfo> getUserInfo() { User user = (User) SecurityContextHolder.getContext() .getAuthentication().getPrincipal(); String email = user.getUsername() + "@spring2go.com"; UserInfo userInfo = new UserInfo(); userInfo.setName(user.getUsername()); userInfo.setEmail(email); return ResponseEntity.ok(userInfo); } } - 验证流程
- 获取授权码
注意:state参数暂忽略
响应案例:
- 获取访问令牌
curl -X POST –user clientapp:123456 http://localhost:8080/oauth/token -H “content-type: application/x-www-form-urlencoded” -d “code=8uYpdo&grant_type=authorization_code&redirect_uri=http%3A%2F%2Flocalh ost%3A9001%2Fcallback&scope=read_userinfo”
案例响应:
{
    "access_token": "36cded80-b6f5-43b7-bdfc-594788a24530",
    "token_type": "bearer",
    "expires_in": 43199,
    "scope": "read_userinfo"
}- 访问资源调用API
curl -X GET http://localhost:8080/api/userinfo -H “authorization: Bearer 36cded80-b6f5-43b7-bdfc-594788a24530”
案例响应:
{
    "name": "bobo",
    "email": "bobo@spring2go.com"
}
2.2 简化模式实现
依赖配置
同2.1服务器配置
//授权服务器配置
@Configuration
@EnableAuthorizationServer
public class OAuth2AuthorizationServer extends
        AuthorizationServerConfigurerAdapter {

    @Override
    public void configure(ClientDetailsServiceConfigurer clients)
            throws Exception {
        clients.inMemory()
            .withClient("clientapp")
            .secret("112233")
            .redirectUris("http://localhost:9001/callback")
            // 简化模式
            .authorizedGrantTypes("implicit")
            .accessTokenValiditySeconds(120)
            .scopes("read_userinfo", "read_contacts");
    }

}
资源服务器配置
同2.1资源接口
同2.1验证流程
- 获取访问令牌
浏览器请求:
响应案例:
- 调用API
curl -X GET http://localhost:8080/api/userinfo -H “authorization: Bearer 0406040a-779e-4b5e-adf1-bf2f02031e83”
案例响应:
{
    "name": "bobo",
    "email": "bobo@spring2go.com"
}
2.3 密码模式实现
依赖配置
同2.1服务器配置
密码模式一步就实现了,要认证和授权都做,需要配置用户认证器。
// 授权服务器配置
@Configuration
@EnableAuthorizationServer
public class OAuth2AuthorizationServer extends
        AuthorizationServerConfigurerAdapter {

	// 用户认证
    @Autowired
    private AuthenticationManager authenticationManager;

    @Override
    public void configure(AuthorizationServerEndpointsConfigurer endpoints)
            throws Exception {
        endpoints.authenticationManager(authenticationManager);
    }

    @Override
    public void configure(ClientDetailsServiceConfigurer clients)
            throws Exception {
        clients.inMemory()
            .withClient("clientapp")
            .secret("112233")
            // 密码模式
            .authorizedGrantTypes("password")
            .scopes("read_userinfo", "read_contacts");
    }

}
资源服务器配置
同2.1资源接口
同2.1验证流程
- 获取访问令牌
curl -X POST –user clientapp:112233 http://localhost:8080/oauth/token -H “accept: application/json” -H “content-type: application/x-www-form-urlencoded” -d “grant_type=password&username=bobo&password=xyz&scope=read_userinfo”
响应案例:
{
    "access_token": "58a02fd5-87f5-44ff-bbdd-d429cf6a2f60",
    "token_type": "bearer",
    "expires_in": 43199,
    "scope": "read_userinfo"
}- 调用API
curl -X GET http://localhost:8080/api/userinfo -H “authorization: Bearer 58a02fd5-87f5-44ff-bbdd-d429cf6a2f60”
案例响应:
{
    "name": "bobo",
    "email": "bobo@spring2go.com"
}
2.4 客户端模式实现
依赖配置
同2.1服务器配置
密码模式一步就实现了,要认证和授权都做,需要配置用户认证器。
// 授权服务器配置
@Configuration
@EnableAuthorizationServer
public class OAuth2AuthorizationServer extends
        AuthorizationServerConfigurerAdapter {

    @Override
    public void configure(ClientDetailsServiceConfigurer clients)
            throws Exception {
        clients.inMemory()
            .withClient("clientdevops")
            // 密码模式
            .secret("789")
            .authorizedGrantTypes("client_credentials")
            .scopes("devops");
    }

}
资源服务器配置
同2.1资源接口
同2.1验证流程
- 获取访问令牌
curl -X POST “http://localhost:8080/oauth/token" –user clientdevops:789 -d “grant_type=client_credentials&scope=devops”
响应案例:
{
    "access_token": "776b162a-949e-4dcb-b16b-9985e8171dc0",
    "token_type": "bearer",
    "expires_in": 43188,
    "scope": "devops"
}- 调用API
curl -X GET http://localhost:8080/api/user -H “authorization: Bearer 776b162a-949e-4dcb-b16b-9985e8171dc0”
案例响应:
[
    {
        "name": "bobo",
        "email": "bobo@spring2go.com"
    }
]
我们可以看到框架对规范定义的几种授权方式做了很好的实现,这几种方式用在第三方登陆是可以的。
但在微服务中使用这个框架做服务本身的授权服务器是远远不够的。比如我们想要用户验证码登陆,手机号密码登陆,扫码登陆等 框架的四种模式就无法授权了。因此我们需要在框架的基础上做改造,使它符合我们的要求。
那么我们怎么改造呢? 如果我们想要在框架的基础上做改造,首先要明白它的原理,知道在哪里扩展。因此第三节我们将探究认证的流程,对框架的源码做简单分析。

