rabbitmq基本操作
这次把一些可能实际工作中遇到的问题整理(或许以后会遇到更多问题),
翻出之前的笔记,之前在学习的时候记录了笔记,但是也没有整理,知识也没有体系.所以这只是老笔记的整理.
1. rabbitmq基本概念
安装:各个系统不同,网上可以轻松找到自己对应的系统.
1.1 四个核心概念
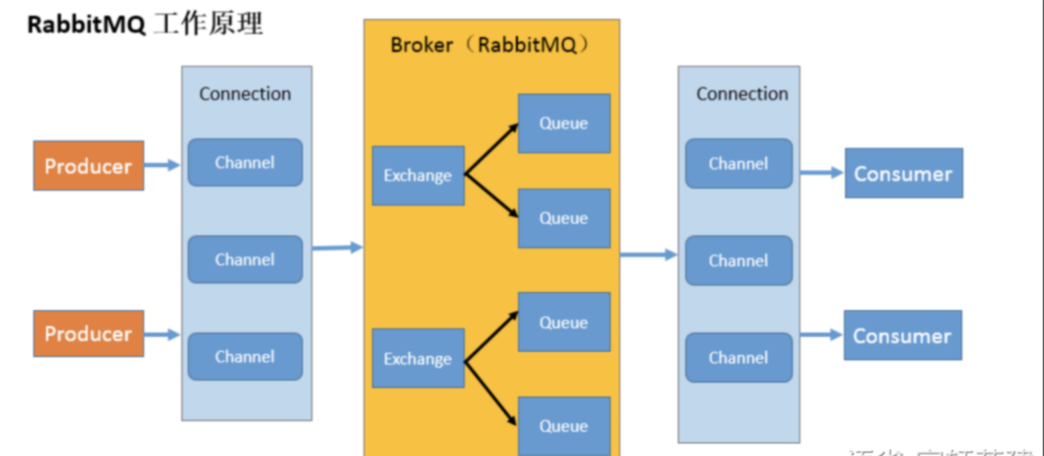
用一张图可以很好的表示
生产者:生产者生产的数据与交换机为一对一关系
交换机:交换机与队列为一对多关系
队列:一个队列只能对应一个消费者
消费者:绑定多个消费者消息也只能被其中一名消费者获取
当然如果没有使用过mq,在这里硬想这四个概念也只能记住名字.安装好之后实际操作,然后进控制台点点点,就能理解的更深了.
1.2 其他概念
- broker:
又称 Server,接收客户端的连接,实现AMQP实体服务,接收和分发消息的应用,RabbitMQ Server 就是 Message Broker - Connection
连接,应用服务与Server的连接,本质上是基于tcp的链接. - Channel
信道,客户端可建立多个Channel,每个Channel代表一个会话任务 - message
MessageProperties 和 body 构成.BasicProperties (基本API)可对消息的优先级、过期时间等参数进行设置 - Exchange
交换机,消息将根据 routeKey 被交换机转发给对应的绑定队列 - queue
消息最终被送到这里等待消费者取走,参数中的Auto-delete意为当前队列的最后一个消息被取出后是否自动删除 - Binding
exchange 和 queue 之间的虚拟连接,二者通过 routingkey 进行绑定 - Routingkey:
路由规则,交换机可以用它来确定消息改被路由到哪里 - Virtual host
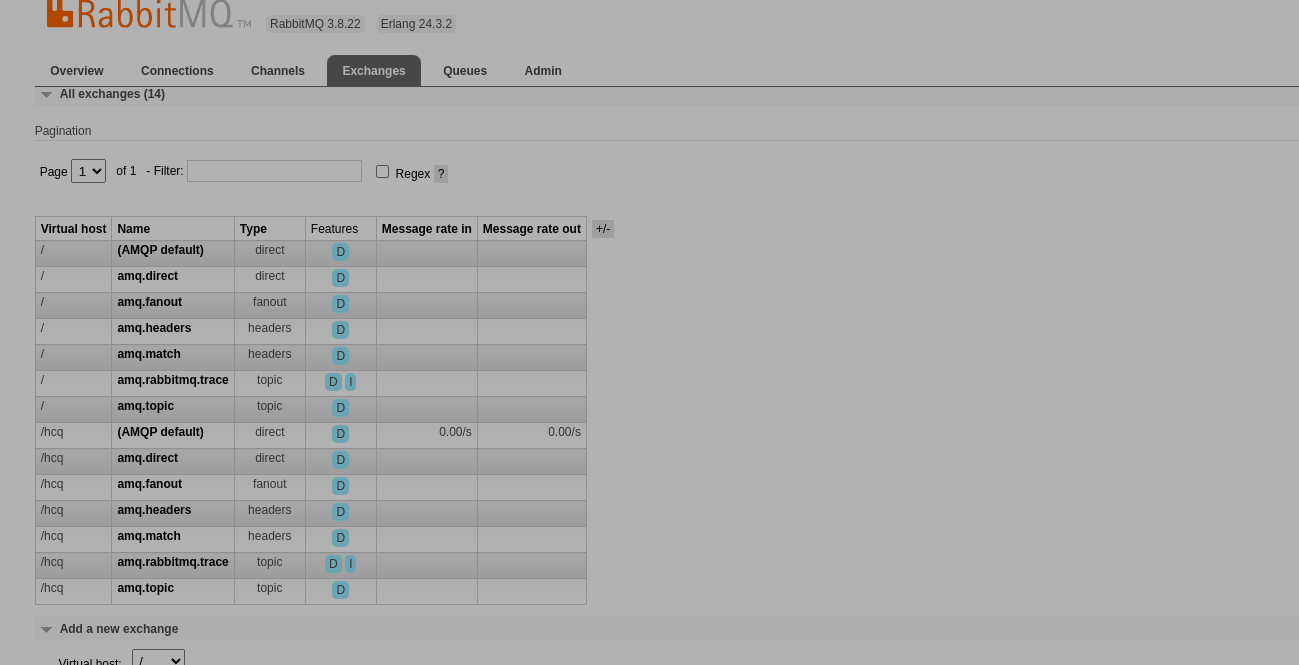
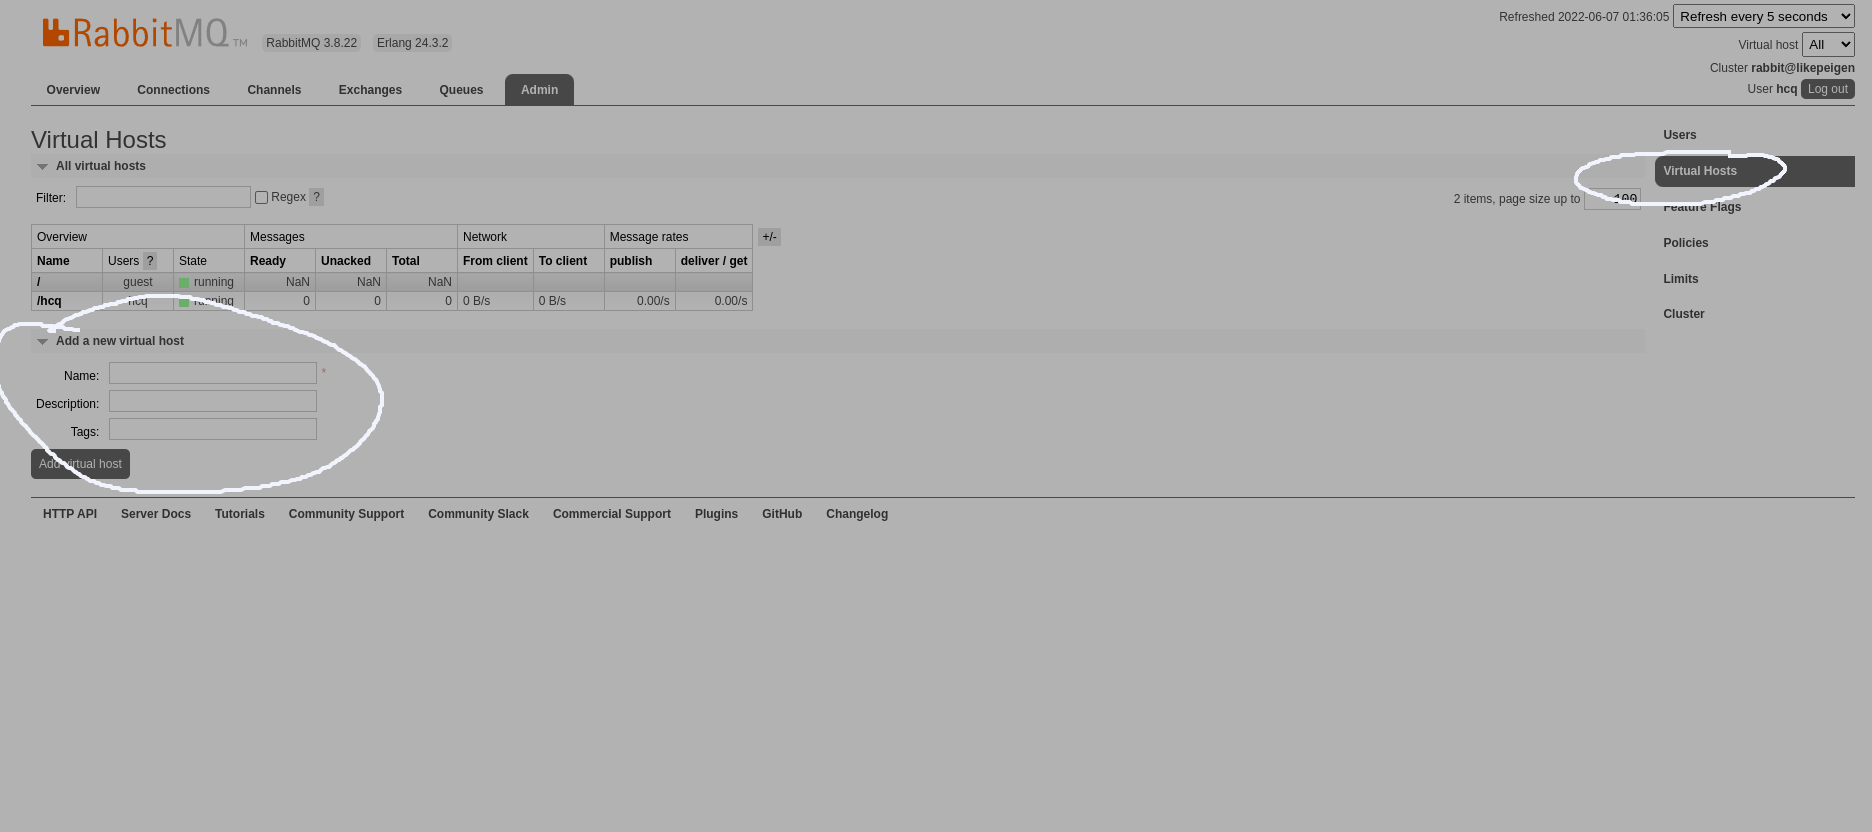
虚拟主机,用于进行逻辑隔离,是最上层的消息路由,一个虚拟主机中可以有多个 Exchange 和 Queue,同一个虚拟主机中不能有名称一样的 Exchange 和 Queue
2. 基本的消息模型
rabbitmq官方支持六种,常用的也就四种.
2.1 maven和虚拟主机
- xml
<dependencies> <dependency> <groupId>org.springframework.boot</groupId> <artifactId>spring-boot-starter-web</artifactId> </dependency> <dependency> <groupId>org.springframework.boot</groupId> <artifactId>spring-boot-starter-amqp</artifactId> </dependency> </dependencies> - 虚拟主机
创建虚拟主机和用户
2.2 workQueues模式
- 生产者
public static void workQueues() throws IOException, TimeoutException {
        //1.链接
        ConnectionFactory factory= new ConnectionFactory();
        //参数
        factory.setHost("127.0.0.1");
        factory.setPort(5672);
        factory.setVirtualHost("/hcq");
        factory.setUsername("hcq");
        factory.setPassword("121056");
        //链接
        Connection connection = factory.newConnection();
        //channel
        Channel channel = connection.createChannel();
        //队列
        channel.queueDeclare("workQueues", true, false, false, null);
        //发送
        String body="workQueues";
        channel.basicPublish("","workQueues",null,body.getBytes());
        //释放
        channel.close();
        connection.close();
}- 消费者
public static void workQueues() throws IOException, TimeoutException {
       //1.链接
       ConnectionFactory factory= new ConnectionFactory();
       //参数
       factory.setHost("127.0.0.1");
       factory.setPort(5672);
       factory.setVirtualHost("/hcq");
       factory.setUsername("hcq");
       factory.setPassword("121056");
       //链接
       Connection connection = factory.newConnection();
       //channel
       Channel channel = connection.createChannel();
       //队列
       channel.queueDeclare("workQueues", true, false, false, null);
       //接受
       Consumer consumer=new DefaultConsumer(channel){
           public void handleDelivery(String consumerTag, Envelope envelope, AMQP.BasicProperties properties, byte[] body) throws IOException {
               System.out.println("body:"+new String(body));
           }
       };
       channel.basicConsume("workQueues",true,consumer);
   }
可以理解为没有指定交换机,而是走了队列,多个消费者消费的话也只能轮询消费.
发布模式
可以理解为没有指定routingKey,交换机会把消息发送到与它绑定的所有队列中.
- 生产者
public class PubPro {
    public static void main(String[] args) throws IOException, TimeoutException {
        //1.链接
        ConnectionFactory factory= new ConnectionFactory();
        //参数
        factory.setHost("127.0.0.1");
        factory.setPort(5672);
        factory.setVirtualHost("/hcq");
        factory.setUsername("hcq");
        factory.setPassword("121056");
        //链接
        Connection connection = factory.newConnection();
        //channel
        Channel channel = connection.createChannel();
        //交换机
        channel.exchangeDeclare("start-fanout", BuiltinExchangeType.FANOUT,true,true,false,null);
        //队列
        channel.queueDeclare("start-fanout_queue1",true,false,false,null);
        channel.queueDeclare("start-fanout_queue2",true,false,false,null);
        //帮顶
        channel.queueBind("start-fanout_queue1","start-fanout","");
        channel.queueBind("start-fanout_queue2","start-fanout","");
        //发送
        String body="pub-pub:"+System.currentTimeMillis();
        channel.basicPublish("start-fanout","",null,body.getBytes());
    }

}- 消费者
消费者1,消费者2,需要监听不同消息队列.
public class PubCon2 {
    public static void main(String[] args) throws IOException, TimeoutException {
//1.链接
        ConnectionFactory factory= new ConnectionFactory();
        //参数
        factory.setHost("127.0.0.1");
        factory.setPort(5672);
        factory.setVirtualHost("/hcq");
        factory.setUsername("hcq");
        factory.setPassword("121056");
        //链接
        Connection connection = factory.newConnection();
        //channel
        Channel channel = connection.createChannel();
        //接受
        Consumer consumer=new DefaultConsumer(channel){
            public void handleDelivery(String consumerTag, Envelope envelope, AMQP.BasicProperties properties, byte[] body) throws IOException {
                System.out.println("body:"+new String(body));
            }
        };
        channel.basicConsume("start-fanout_queue2",true,consumer);
        //释放--消费者不需要关闭资源
        //channel.close();
        //connection.close();
    }

}
直连模式
可以理解为只有routingKey完全相同,才会把消息发送到与routingKey匹配的队列上.
- 消费者
public class RoutingPro {
    public static void main(String[] args) throws IOException, TimeoutException {
        //1.链接
        ConnectionFactory factory= new ConnectionFactory();
        //参数
        factory.setHost("127.0.0.1");
        factory.setPort(5672);
        factory.setVirtualHost("/hcq");
        factory.setUsername("hcq");
        factory.setPassword("121056");
        //链接
        Connection connection = factory.newConnection();
        //channel
        Channel channel = connection.createChannel();
        //交换机
        channel.exchangeDeclare("start-route", BuiltinExchangeType.DIRECT,true,true,false,null);
        //队列
        channel.queueDeclare("start-route_queue1",true,false,false,null);
        channel.queueDeclare("start-route_queue2",true,false,false,null);
        //帮顶
        channel.queueBind("start-route_queue1","start-route","info");
        channel.queueBind("start-route_queue2","start-route","info");
        channel.queueBind("start-route_queue2","start-route","error");
        //发送
        String body="route:info:"+System.currentTimeMillis();
        String body2="route:error:"+System.currentTimeMillis();
        channel.basicPublish("start-route","info",null,body.getBytes());
        channel.basicPublish("start-route","error",null,body2.getBytes());
    }

}- 生产者
public class RoutingCon1 {
    public static void main(String[] args) throws IOException, TimeoutException {
//1.链接
        ConnectionFactory factory= new ConnectionFactory();
        //参数
        factory.setHost("127.0.0.1");
        factory.setPort(5672);
        factory.setVirtualHost("/hcq");
        factory.setUsername("hcq");
        factory.setPassword("121056");
        //链接
        Connection connection = factory.newConnection();
        //channel
        Channel channel = connection.createChannel();
        //接受
        Consumer consumer=new DefaultConsumer(channel){
            public void handleDelivery(String consumerTag, Envelope envelope, AMQP.BasicProperties properties, byte[] body) throws IOException {
                System.out.println("body:"+new String(body));
            }
        };
        channel.basicConsume("start-route_queue1",true,consumer);
        //释放--消费者不需要关闭资源
        //channel.close();
        //connection.close();
    }
}
topic模式
可以理解为直连模式升级版,当routingKey基于一定规则匹配上时,发送到与交换机帮顶的匹配上的队列中.
- 生产者
public class TopicPro {
    public static void main(String[] args) throws IOException, TimeoutException {
        //1.链接
        ConnectionFactory factory= new ConnectionFactory();
        //参数
        factory.setHost("127.0.0.1");
        factory.setPort(5672);
        factory.setVirtualHost("/hcq");
        factory.setUsername("hcq");
        factory.setPassword("121056");
        //链接
        Connection connection = factory.newConnection();
        //channel
        Channel channel = connection.createChannel();
        //交换机
        channel.exchangeDeclare("start-topic", BuiltinExchangeType.TOPIC,true,true,false,null);
        //队列
        channel.queueDeclare("start-topic_queue1",true,false,false,null);
        channel.queueDeclare("start-topic_queue2",true,false,false,null);
        //帮顶
        channel.queueBind("start-topic_queue1","start-topic","#.error");
        channel.queueBind("start-topic_queue1","start-topic","order.*");
        channel.queueBind("start-topic_queue2","start-topic","*.*");
        //发送
        String body="topic:info:"+System.currentTimeMillis();
        String body2="topic:error:"+System.currentTimeMillis();
        channel.basicPublish("start-topic","order.info",null,body.getBytes());
        channel.basicPublish("start-topic","goods.error",null,body2.getBytes());
        channel.basicPublish("start-topic","order.error",null,body2.getBytes());
        channel.basicPublish("start-topic","goods.info",null,body.getBytes());
    }

}- 消费者
public class TopicCon1 {
    public static void main(String[] args) throws IOException, TimeoutException {
//1.链接
        ConnectionFactory factory= new ConnectionFactory();
        //参数
        factory.setHost("127.0.0.1");
        factory.setPort(5672);
        factory.setVirtualHost("/hcq");
        factory.setUsername("hcq");
        factory.setPassword("121056");
        //链接
        Connection connection = factory.newConnection();
        //channel
        Channel channel = connection.createChannel();
        //接受
        Consumer consumer=new DefaultConsumer(channel){
            public void handleDelivery(String consumerTag, Envelope envelope, AMQP.BasicProperties properties, byte[] body) throws IOException {
                System.out.println("body:"+new String(body));
            }
        };
        channel.basicConsume("start-topic_queue1",true,consumer);
        //释放--消费者不需要关闭资源
        //channel.close();
        //connection.close();
    }
}
3. 整合springboot
整合spring在刚学习mq的时候还做过,不过现在都是springboot的项目,因此只整合一下springboot.
pom文件
<dependencies>
        <dependency>
            <groupId>org.springframework.boot</groupId>
            <artifactId>spring-boot-starter-web</artifactId>
        </dependency>
        <dependency>
            <groupId>org.springframework.boot</groupId>
            <artifactId>spring-boot-starter-amqp</artifactId>
        </dependency>
    </dependencies>
yml
server:
  port: 6700
spring:
  rabbitmq:
    port: 5672
    host: localhost
    username: hcq
    password: 121056
    #这个配置是保证提供者确保消息推送到交换机中,不管成不成功,都会回调
    publisher-confirm-type: correlated
    #保证交换机能把消息推送到队列中
    publisher-returns: true
    virtual-host: /hcq
    #这个配置是保证消费者会消费消息,手动确认
    listener:
      simple:
        acknowledge-mode: manual
    template:
      mandatory: true
3.1 配置类
RabbitConfig
package com.guide.rabbit.config;

import lombok.extern.slf4j.Slf4j;
import org.springframework.amqp.core.*;
import org.springframework.amqp.rabbit.connection.CachingConnectionFactory;
import org.springframework.amqp.rabbit.connection.ConnectionFactory;
import org.springframework.amqp.rabbit.core.RabbitTemplate;
import org.springframework.amqp.support.converter.Jackson2JsonMessageConverter;
import org.springframework.amqp.support.converter.MessageConverter;
import org.springframework.beans.factory.annotation.Value;
import org.springframework.context.annotation.Bean;
import org.springframework.context.annotation.Configuration;

/*配置类*/
@Configuration
@Slf4j
public class RabbitConfig {
    /**
     * MQ地址
     */
    @Value("${spring.rabbitmq.host}")
    private String host;
    /**
     * MQ端口
     */
    @Value("${spring.rabbitmq.port}")
    private int port;

    /**
     * 用户名
     */
    @Value("${spring.rabbitmq.username}")
    private String username;

    /**
     * 密码
     */
    @Value("${spring.rabbitmq.password}")
    private String password;
    /**
     * 虚拟主机
     */
    @Value("${spring.rabbitmq.virtual-host}")
    private String virtualHost;

    // 定义一个或多个交换机
    public static final String EXCHANGE_A = "ex-direct-guide1";
    public static final String EXCHANGE_B = "ex-topic-guide2";

    // 定义队列
    public static final String QUEUE_A = "queue-guide1";
    public static final String QUEUE_B = "queue-guide2";

    // 定义routing-key
    public static final String ROUTING_KEY_A = "routing.key.guide1";
    public static final String ROUTING_KEY_B = "routing.key.*";

    /**
     * 针对消费者配置
     * 1. 设置交换机类型
     * 2. 将队列绑定到交换机
     FanoutExchange: 将消息分发到所有的绑定队列,无routingkey的概念
     HeadersExchange :通过添加属性key-value匹配
     DirectExchange:按照routingkey分发到指定队列
     TopicExchange:多关键字匹配
     **/
    @Bean
    public DirectExchange defaultExchange() {
        return new DirectExchange(EXCHANGE_A);
    }

    //topic交换机
    @Bean
    public TopicExchange topicExchange(){
        return new TopicExchange(EXCHANGE_B);
    }
    /**
     * 获取队列A
     * @return
     */
    @Bean
    public Queue queueA() {
        return new Queue(QUEUE_A, true); //队列持久
    }

    @Bean
    public Queue queueB() {
        return new Queue(QUEUE_B, true); //队列持久
    }
    // 一个交换机可以绑定多个消息队列,也就是消息通过一个交换机,可以分发到不同的队列当中去。
    @Bean
    public Binding binding() {
        return BindingBuilder.bind(queueA()).to(defaultExchange()).with(RabbitConfig.ROUTING_KEY_A);
    }

    /**
     * 将queueB和ROUTING_KEY_B绑定
     * @return
     */
    @Bean
    public Binding binding1() {
        return BindingBuilder.bind(queueB()).to(topicExchange()).with(RabbitConfig.ROUTING_KEY_B);
    }

    /**
     * queueA和ROUTING_KEY_B绑定
     * @return
     */
    @Bean
    public Binding binding2() {
        return BindingBuilder.bind(queueA()).to(topicExchange()).with(RabbitConfig.ROUTING_KEY_B);
    }
    @Bean
    public MessageConverter messageConverter(){
        return new Jackson2JsonMessageConverter();
    }
    // 创建连接工厂,获取MQ的连接
    @Bean
    public ConnectionFactory connectionFactory() {
        CachingConnectionFactory connectionFactory = new CachingConnectionFactory(host,port);
        connectionFactory.setUsername(username);
        connectionFactory.setPassword(password);
        connectionFactory.setVirtualHost(virtualHost);
        return connectionFactory;
    }

    // 创建rabbitTemplate
    @Bean(name = "rabbitTemplate")
    public RabbitTemplate rabbitTemplate() {
        RabbitTemplate template = new RabbitTemplate(connectionFactory());
        //默认使用simpleMessageConverter  在此处更改为json序列化方案
        template.setMessageConverter(messageConverter());
        return template;
    }

}
3.2 生产者
MsgProducer
其实就是调用rabbitTemplate来发送消息
@Component
@Slf4j
public class MsgProducer{
    @Autowired
    private RabbitTemplate rabbitTemplate;
    private ObjectMapper objectMapper=new ObjectMapper();
    public void sendMsg(String content) throws JsonProcessingException {

        CorrelationData correlationId = new CorrelationData(UUID.randomUUID().toString());
        RabbitMessage rabbitMessage=new RabbitMessage();
        rabbitMessage.setId(21323132132l);
        rabbitMessage.setMsg(content);
        rabbitMessage.setSendTime(new Date());
        log.info("【++++++++++++++++++ message :{}】", objectMapper.writeValueAsString(rabbitMessage));
        //把消息放入ROUTING_KEY_A对应的队列当中去,对应的是队列A
        rabbitTemplate.convertAndSend(RabbitConfig.EXCHANGE_A, RabbitConfig.ROUTING_KEY_A, rabbitMessage, correlationId);
    }
}
3.3 消费者
- MsgReceiver
形式上就是在类上加@RabbitListener(queues = RabbitConfig.QUEUE_A) 注解,要标注队列名.
在方法上加 @RabbitHandler注解.
@Component
@RabbitListener(queues = RabbitConfig.QUEUE_A)
public class MsgReceiver {
    @RabbitHandler
    public void process(@Payload RabbitMessage rabbitMessage) {
        //String body = new String(message.getBody());
        System.out.println("接收处理队列A当中的消息: " + rabbitMessage.toString());
    }
}
小结
- 总结了rabbitmq中的组件,概念,
- 四种常见的模式
- 整合springboot


